


display google sheets range as an html table
This page is mainly about display google sheets range as an html table
There are two ways of writing Google Apps scripts - as a container-bound script which is embedded into the spreadsheet or a stand-alone script which can be called independently. In this situation, we'll be using a stand-alone script so we can reuse it every time we need to embed a table in our webpage.
1
Choose a suitable folder for your script
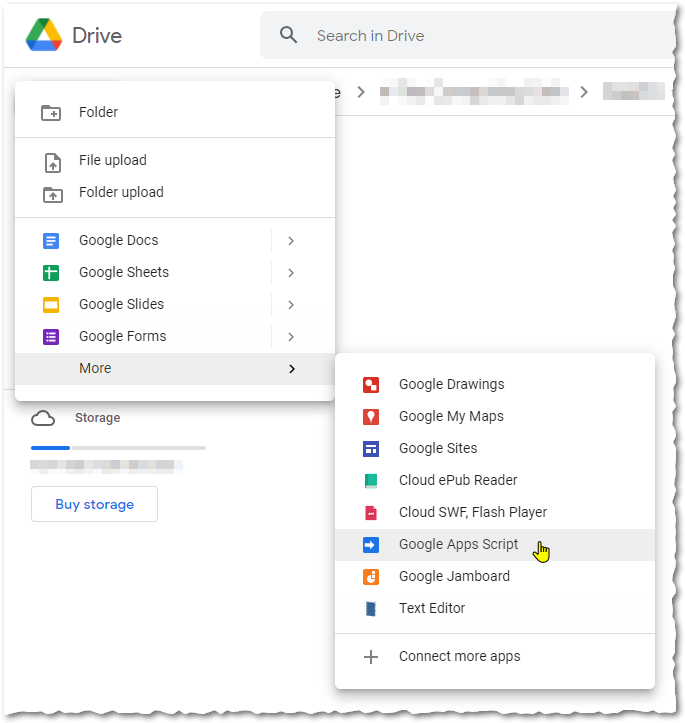
You should store your script somewhere in your Google drive where you can find it. Navigate to this folder and choose "New > More > Google Apps Script"
2
Give your script a name
Click on 'Untitled project' and give your script a name - I've called mine 'gsheet_to_table', obvs.
3
Enable the 'sheets' service.
Click on the '+' sign next to 'Services' and search for 'Google Sheets API' in the list. Click Add. This makes sure that your script has access to all the funky things that Google lets you do with Google Sheets data. Noice.
4
Write your
code.gsOne specific function in the
code.gscode.gsvar spreadSheetId = ""; // Google Spreadsheet ID
var dataRange = ""; // Easier to use named ranges, but if you use raw ranges, replace ':' with '_'
var headers = ""; // Encode spaces as '-', pipe separate headers
function doGet(e) { // This function runs when the app executes
spreadSheetId = e.parameter.id;
// colons cannot be passed as URL parameters
dataRange = e.parameter.range.replace("_", ":");
headers = e.parameters.headers;
return HtmlService
.createTemplateFromFile('index')
.evaluate()
.setXFrameOptionsMode(HtmlService.XFrameOptionsMode.ALLOWALL);
}
function getData(spreadSheetId,dataRange){ // Get data from Google sheet and return as an array
var range = Sheets.Spreadsheets.Values.get(spreadSheetId,dataRange);
var values = range.values;
return values;
}
5
Prepare the required js libraries and css files
For the table behaviour to work, you need a few Javascript and css libraries, notably...
jQuery core (currently 3.6.0)
<script
 src="https://code.jquery.com/jquery-3.6.0.min.js"
 integrity="sha256-/xUj+3OJU5yExlq6GSYGSHk7tPXikynS7ogEvDej/m4="
 crossorigin="anonymous">
</script>
Datatables (currently 1.11.3)
<script
 type="text/javascript"
 src="https://cdn.datatables.net/1.11.3/js/jquery.dataTables.min.js">
</script>
<link rel="stylesheet"
 type="text/css"
 href="https://cdn.datatables.net/1.11.3/css/jquery.dataTables.min.css">
Even if you include these files in your main website, you are very likely to need to include them in here as well because you probably won't be accessing the script on the same domain. There is a slight performance hit if you are using the table function (because jQuery will load again) but since these files are cached anyway, it's not going to be that noticeable (as long as you are using exactly the same version of jQuery on your site and in the Apps script).
Also, you'll find that there will be no styling applied to the HTML file - it will look pretty naff. You could style it yourself using the table styling tool at datatables.net (see the 'Hungry for more?' section at the bottom for implementation) but you can apply limited styling by including a Bootstrap css file.
<link rel="stylesheet"
 type="text/css"
 href="https://cdnjs.cloudflare.com/ajax/libs/twitter-bootstrap/5.0.1/css/bootstrap.min.css"/>
You can see the Bootstrap classes in the table tag.
6
Write your
index.htmlThe HTML that generates the table is next to write, but, thankfully, it's very straightforward. Click the '+' sign next the 'Files' and choose 'HTML'. Name the file 'index' but don't put .html after it or it'll appear twice. Replace all the content with the following.
<!DOCTYPE html>
<html>
 <head>
  <base target="_top">
  <!-- you must include jQuery again here because the domain is different -->
   <script
    src="https://code.jquery.com/jquery-3.6.0.min.js"
    integrity="sha256-/xUj+3OJU5yExlq6GSYGSHk7tPXikynS7ogEvDej/m4="
    crossorigin="anonymous">
   </script>
  <!-- These are the js and css for datatables -->
   <script
    type="text/javascript"
    src="https://cdn.datatables.net/1.11.3/js/jquery.dataTables.min.js">
   </script>
   <link
    rel="stylesheet"
    type="text/css"
    href="https://cdn.datatables.net/1.11.3/css/jquery.dataTables.min.css">
  <!-- Style the majority of the table with Bootstrap table styling -->
   <link
    rel="stylesheet"
    type="text/css"
    href="https://cdnjs.cloudflare.com/ajax/libs/twitter-bootstrap/5.0.1/css/bootstrap.min.css"/>
  <!-- Javascript to generate table -->
   <script>
    // Get parameters from server (app)
     const headers = JSON.parse("<?=JSON.stringify(headers)?>").toString().replace("-"," ").split("|");
     const spreadSheetId = JSON.parse("<?=JSON.stringify(spreadSheetId)?>");
     const dataRange = JSON.parse("<?=JSON.stringify(dataRange)?>");
    // Pass parameters to getData() function
     google.script.run.withSuccessHandler(showData).getData(spreadSheetId,dataRange);
    // Build the column object and display table
     function showData(dataArray){ // Generate the table from the data array
      $(document).ready(function(){
       var columns = [];
       headers.forEach(function(header){
        columns.push({"title":header});
       })
      $('#data-table').DataTable({
       data: dataArray,
       order: [[0,"asc"]],
       autoWidth: true,
       columns: columns
      });
     });
    }
   </script>
 </head>
 <body>
  <table id="data-table" style="width:100% !important" class="table table-striped table-sm table-hover table-bordered">
   <!-- Table data is added by the showData() function -->
  </table>
 </body>
</html>
7
Deploy your app
Before you can use your app, you need to deploy it. This assigns it a unique URL and the permissions etc necessary for it to run as a standalone script.
Choose 'Deploy > New Deployment'.
Click the gear next to 'Select Type'.
Choose 'Web app'.
Give the script a description. I used "Display GSheet as a Table".
Let the script execute as you.
Change 'Who has access' to 'Anyone'.
Hit 'Deploy'.
After a little while, you should get a message asking you to authorise the script to have access to your data. You should really authorise this access unless you don't want your spreadsheet data to display as a table (and then why are you even here?).
Hit 'Authorise Access'.
Choose your Google account.
You will now get a scary warning that 'Google hasn't verified the app' and that you are exposing your sensitive, personal data to the whim of your code. You can verify your app if you like (let me know how you get on) but, since you wrote it, you can probably trust it.
Click 'Advanced'.
Click 'Go to gsheet_to_table (unsafe)' (or whatever you called your script).
Read the blurb.
Click 'Allow'.
You'll probably get a security alert email from Google, but meh.
Success! You've now successfully deployed your web app (Version 1)! You should see a 'Deployment ID' which you can copy if you like or, more usefully, a unique URL for your web app.
8
Test your shiny new Web app
OK, so go ahead and click the URL. Whoops! It just gives an error message ::disappointed::...
TypeError: Cannot read property 'replace' of undefined (line 9, file "Code")
Don't worry - all is not lost. Because we've made sure that our script is generalised and can be used to display a table from any Google sheet and range therein that we choose, we need to provide our script with some parameters.
Google sheet ID;
Range to display data from, either named or raw;
A pipe separated list of headers for the table columns, replacing spaces with '-'.
For instance, I've created a simple Google sheet looks like this...
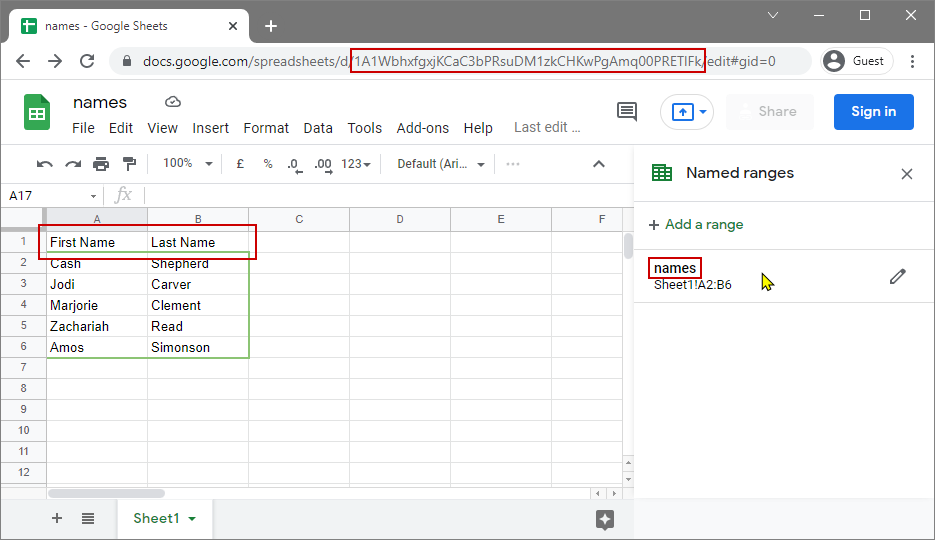
...where...
id = 1A1WbhxfgxjKCaC3bPRsuDM1zkCHKwPgAmq00PRETlFk
range = names
headers = First-Name|Last-Name
It's way easier to use named ranges in your spreadsheet but if you insist on using raw ranges, like "sheet1!A1:B5", you must replace the colon with an underscore to give "sheet1!A1_B5" - URLs don't like colons.
Notice also that I've replaced the spaces in the column headers with '-' because spaces can behave a little strangely in the URL - the Javascript replaces them with spaces when it generates the table. So, you should structure your URL like this...
https://script.google.com/macros/s/DEPLOYMENT_ID/exec?id=SPREADSHEET_ID&range=RANGE&headers=HEADERS
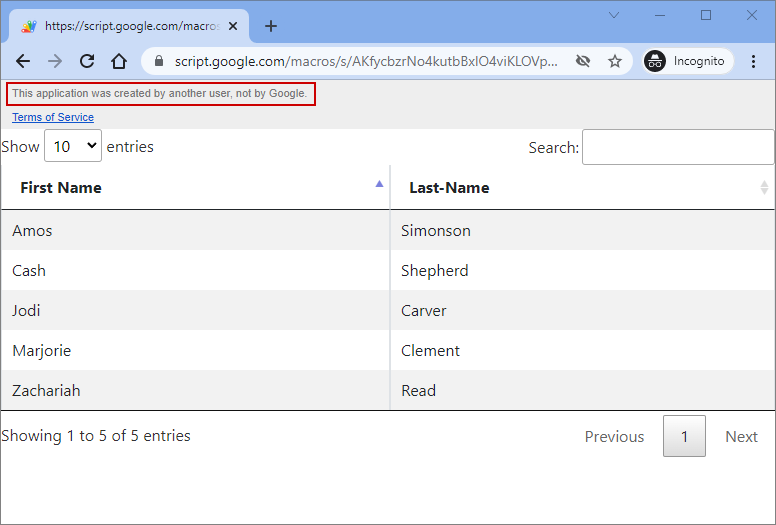
...where you replace 'DEPLOYMENT_ID' with your scripts' Deployment ID, 'SPREADSHEET_ID' with the Spreadsheet ID, 'RANGE' with the named range and 'HEADERS' with the list of headers. If you use the examples I've given above (and your own Deployment ID), fingers crossed, you should see something like this...
9
Removing the warning.
In the last image, you should see a warning at the top of the page "This application was created by another user, not by Google". Unfortunately, because this is true, you can't remove it. However, if you embed the script in an HTML page as an iFrame, it doesn't display, primarily because of this line in
code.gs.setXFrameOptionsMode(HtmlService.XFrameOptionsMode.ALLOWALL);So, the source code for embedding your shiny web app table in your website is...
<iframe
 src="https://script.google.com/macros/s/DEPLOYMENT_ID/exec?id=SPREADSHEET_ID&range=RANGE&headers=HEADERS"
 width="100%"
 height="600px"
 style="border:none;">
</iframe>
...which, for my Google Sheet should look like this...
[f s:"https://script.google.com/macros/s/AKfycbzrNo4kutbBxIO4viKLOVp03MaAsrActkf_KMPVYvc3BVNdCtsKyiM2OD1PyDRm_3sj/exec?i=1A1WbhxfgxjKCaC3bPRsuDM1zkCHKwPgAmq00PRETlFk&r=names&h=First-Name|Last-Name" w:"100%" h:"600px" t:"" b:"" c:""]
Hungry for more?
https://datatables.net/manual/styling/theme-creator
Last modified: November 15th, 2021

")
")
")
")
")
")
")
")
")
")


