


python space invaders
Build a classic game of Space Invaders using Python Turtle

turtle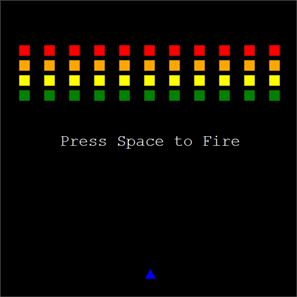
Classic Space Invaders... but you can't play it here...
0
Get ready to code!
1
Open up Thonny
2
You should get a blank script editor and output window. If not, create a new file from the File menu.
3
Organise your workspace.
1
Setting up the Game Screen
Before we can draw any shapes or move any pieces, we need a blank canvas to work with. This step is designed to initialise the game window, set its size, give it a background colour, and title it. We also use a special command called
tracer(0)turtleimport turtle
import time
import math
wn = turtle.Screen()
wn.title("Space Invaders - The Computing Café")
wn.bgcolor("black")
wn.setup(width=600, height=600)
wn.tracer(0)
# Next: 2. Creating the Player
2
Creating the Player
Now we create the player's laser cannon. In the
turtleplayer = turtle.Turtle()
player.speed(0)
player.shape("triangle")
player.color("blue")
player.setheading(90)
player.penup()
player.goto(0, -250)
# Next: 3. Creating the Player's Bullet
3
Creating the Player's Bullet
Next, we create the player's bullet. This starts as a small, yellow square. We will hide it and move it off-screen to begin with. We also create a variable called
bullet_statebullet = turtle.Turtle()
bullet.speed(0)
bullet.shape("square")
bullet.color("yellow")
bullet.shapesize(stretch_wid=0.5, stretch_len=0.5)
bullet.penup()
bullet.hideturtle()
bullet.goto(0, -400)
bullet_state = "ready"
bullet_speed = 20
# Next: 4. The Message Display
4
The Message Display
We want to tell the player how to control the game. To do this, we create another turtle object. However, we don't actually want to see this turtle at all - we only want to use it to write text onto the screen! We will hide the turtle shape, move it to the centre of the screen, and use it to display a starting instruction.
message = turtle.Turtle()
message.speed(0)
message.color("white")
message.penup()
message.hideturtle()
message.goto(0, 0)
message.write("Press Space to Fire", align="center", font=("Courier", 24, "normal"))

# Next: 5. Building a Fleet of Invaders
5
Building a Fleet of Invaders
A game of Space Invaders isn't complete without aliens to fight! Instead of writing the code for an invader 44 separate times, we use a programming technique called a "nested loop" (a loop inside a loop). The outer loop will run 4 times to create 4 rows. The inner loop will run 11 times to create 11 columns. As each invader is generated, it is coloured based on its row and added to an empty list so the computer can keep track of it later.
invaders = []
colours = ["red", "orange", "yellow", "green"]
invader_speed = 2
for y in range(4):
    for x in range(-5, 6):
        invader = turtle.Turtle()
        invader.speed(0)
        invader.shape("square")
        invader.color(colours[y])
        invader.penup()
        invader.goto(x * 50, 250 - (y * 30))
        invaders.append(invader)

# Next: 6. Adding Player Controls
6
Adding Player Controls
You need to be able to interact with the game! Here, we define three functions (blocks of reusable code). Two functions will move the player left and right by checking its current coordinate and adding or subtracting pixels. The third function will fire the bullet by changing its state from "ready" to "fire", only if it isn't already flying across the screen. Finally, we tell the computer screen to "listen" for keyboard inputs and link our functions to specific keys.
def player_right():
    x = player.xcor()
    if x < 240:
        x += 20
        player.setx(x)
def player_left():
    x = player.xcor()
    if x > -240:
        x -= 20
        player.setx(x)
def fire_bullet():
    global bullet_state
    if bullet_state == "ready":
        message.clear()
        bullet_state = "fire"
        x = player.xcor()
        y = player.ycor() + 10
        bullet.goto(x, y)
        bullet.showturtle()
wn.listen()
wn.onkeypress(player_right, "Right")
wn.onkeypress(player_left, "Left")
wn.onkeypress(fire_bullet, "space")

# Next: 7. The Main Game Loop & Invader Movement
7
The Main Game Loop & Invader Movement
This is the engine of your game. The
while True:time.sleepwhile True:
wn.update()
time.sleep(0.01)
for invader in invaders:
x = invader.xcor()
x += invader_speed
invader.setx(x)
edge_hit = False
for invader in invaders:
if invader.xcor() > 280 or invader.xcor() < -280:
edge_hit = True
break
if edge_hit:
for invader in invaders:
y = invader.ycor()
y -= 10
invader.sety(y)
invader_speed *= -1
# Next: 8. Bullet and Invader Collisions
8
Bullet and Invader Collisions
Finally, we need to program the combat. The computer doesn't automatically know when two shapes touch; we have to tell it. We move the bullet up the screen if it's in the "fire" state, and check for collisions using the
distance()while True: if bullet_state == "fire":
y = bullet.ycor()
y += bullet_speed
bullet.sety(y)
if bullet.ycor() > 290:
bullet.hideturtle()
bullet_state = "ready"
for invader in invaders:
if bullet_state == "fire" and bullet.distance(invader) < 20:
bullet.hideturtle()
bullet_state = "ready"
bullet.goto(0, -400)
invader.goto(0, 1000)
invaders.remove(invader)
break
# ...and we're done!
USE - MODIFY - CREATE

Watch carefully what happens. Can you clear the screen of all the invaders? What happens after the last one is gone?
USE - MODIFY - CREATE
1
A New Coat of Paint
Change the look of your game by altering the colours to match your own style.
Find the line that sets the background colour:
wn.bgcolor("black")Try changing "black" to "navy" or "darkslategrey".
Locate the player and bullet colour settings:
player.color("blue")bullet.color("yellow")Pick your favourite colours and swap them in!
2
Resize the Player
Is the player cannon too big or too small? You can change its size easily.
Find the line:
player.shape("triangle")Right after this line, add a new one:
player.shapesize(stretch_wid=2, stretch_len=1.5)Modify the
stretch_widstretch_len3
Alter the Speed
You can tweak how fast the game plays by changing the speed of the invaders, the bullet, and the player.
Look for
invader_speed = 2bullet_speed = 20Change these numbers to make the game easier or harder.
To make the player move faster, find
x += 20x -= 20Increase
20304
Invader Formation
You can easily add more rows of invaders by modifying the list of colours and the loop that generates them.
Find the list of colours:
colours = ["red", "orange", "yellow", "green"]Add two more colours to the list, such as "purple" and "pink".
Directly below that, find the loop:
for y in range(4):Change the
465
Customise the Message
Make the game interface uniquely yours.
Locate the text written to the screen at the start:
message.write("Press Space to Fire", ...)Change the string to something else, like "Let's Blast Some Aliens!".
USE - MODIFY - CREATE

1
Keep Score
Create a new turtle object to act as a scoreboard and place it at the top of the screen.
Create a score variable starting at 0.
Use the
turtle.write()Remember to clear the old score before writing the new one!
2
Multiple Lives
Create a lives variable set to 3.
The game ends if the invaders reach the player. Modify your main loop to check the `ycor()` of the invaders.
If any invader gets too low (e.g., below -220), reset the game and subtract a life.
When lives reach 0, clear the screen and display a "Game Over" message.
3
Need for Speed
Make the game progressively harder as the player destroys invaders.
Add logic inside your collision loop that slightly increases the absolute value of
invader_speedThis will make the remaining invaders move faster and faster!
4
Invaders Fire Back
Create an invader bullet turtle, similar to the player's bullet.
In your main loop, use Python's
randomAdd a collision check between the invader bullet and the player. If they hit, the player loses a life.
5
Add Sound Effects
Depending on your operating system, research how to import the
winsoundosTrigger a short 'pew' sound when the player fires, and a small 'boom' sound when an invader is hit.

Last modified: July 1st, 2026