


google antigravity
Turn your app ideas into reality without typing endless code. Google Antigravity gives you a personal team of AI assistants to build your projects faster than ever.
Ever had an awesome idea for an app or game but got stuck on the complicated code? Google Antigravity fixes that by putting you in charge as the director of your own personal AI development team. Instead of staring at a blank screen trying to memorize syntax, you simply explain what you want to build, and the AI goes to work writing the code, handling the boring setup, and squashing errors. It’s like having a coding superpower that lets you skip the frustrating roadblocks and focus entirely on the fun stuff - designing, experimenting, and bringing your biggest ideas to life - all while keeping total control over your final project.
Phase 1: Installation & Environment Setup
1
Download the App
Head over to the official website and download the Windows installer file (it will be called something like Antigravity.exe).
2
Run the Installer
Find the downloaded file and double-click it. If you are running in a standard user account on Windows then the installation will proceed normally. If you are running in the main machine administrator account (as I am - don't judge) then you will get a warning but click Continue.
3
Setup
Follow through the setup prompts:
1
Choose a theme
2
Choose the Antigravity 'Agent' mode - I would recommend 'Review-driven Development' as it suggests.
3
Leave the default options on the editor configuration for now.
4
This is a Google Product so, to continue you must either sign in with a Google Account (the recommended route, giving you access to Gemini AI models for guided agentic development) or create a Google Cloud Platform (GCP) project instead, which is really designed for enterprise routes.
5
Finally, accept the user agreements and wait for the setup to complete.
Antigravity Workspaces
To keep your development environment organised, especially when managing multiple domains, you can anchor your workspace to a specific directory (like
httpdocs1
Open the Target Folder
1
Connect to your server in Antigravity.
2
Click File - Open Folder....
3
Enter the exact path to your target directory (e.g.,
/var/www/vhosts/yourdomain.com/httpdocs2
Save the Workspace
1
Click File - Save Workspace As....
2
Save the configuration file (ending in
.code-workspace3
You can now easily return to this isolated environment by selecting File - Open Workspace from File... or finding the shortcut and double clicking it.
Troubleshooting
Missing Updater
If, like me, you are running under the main machine administrator, Antigravity will disable the updater as a safety precaution.
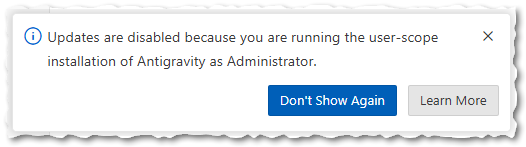
You will need to manually update the installation. You have two options...
1
The "In-Place" Reinstall (Easiest)
You do not need to uninstall your current version, so your data and settings are completely safe.
1
Download the standard Windows installer from the official website.
2
Close Antigravity if it is currently open.
3
Run the installer over your current setup.
4
Wait for installation to complete and enjoy the latest version.
2
The Command Line Fast-Track
If you prefer using the terminal, Windows Package Manager can force the update.
1
Open a Windows Command Prompt as Administrator.
2
Run the following command:
winget install --id Google.Antigravity -e --source winget3
The patch will download and apply automatically.
Bypassing Chroot Jails for Antigravity Access via SSH
If you are using Plesk, you might encounter a connection failure when you try to connect to an SSH host (e.g.,
uname: command not found1
Log into your Plesk Control Panel as an administrator.
2
Go to Subscriptions and select your domain.
3
Click on the Web Hosting Access icon.
4
Locate the Access to the server over SSH dropdown menu.
5
Change the setting from
/bin/bash (chrooted)/bin/bash6
Click OK to save.
Phase 2: Securing the Workspace Structure
To ensure that the agent's instructions, backend logic, and database schemas are never accidentally exposed to the public web, structure your root project folder with a strict separation between private application code and public-facing assets.
1
Create a master directory for your new project.
It's likely that, if you are using using Plesk on a shared VPS hosting or you have set up your own server, spinning up a new subscription will already have created a new vhosts subdirectory with an
httpdocs/var/www/vhosts/mywebsite.com/httpdocs2
Organise your workspace
Replicate this directory structure. Obviously, Your
httpdocs/public//httpdocs/core/src/moduleshttpdocs└── httpdocs <- Project root
├── public/ <- PUBLIC: Your single webroot
│ ├── style/ <- Shared across all subdomains
│ ├── icons/ <- Shared across all subdomains
│ └── sounds/ <- Shared across all subdomains
└── core/ <- PRIVATE: Your single Node.js engine
├── .antigravity/ <- Your instructions, log and todo markdown files
│ └── CHANGELOG.md <- For you to record completed work
│ └── SKILLS.md <- Your AI Agent skills.
│ └── TODO.md <- Current tasks, known bugs, and future ideas
├── src/
│ ├── infrastructure/ <- Shared DB connection, Redis, Zod schemas
│ ├── modules/ <- Strictly isolated domain boundaries
│ │ ├── shop/
│ │ ├── browse/
│ │ ├── profile/
│ │ ├── account/
│ │ ├── contact/
│ │ └── blog/
│ └── index.ts <- Express setup & Subdomain routing
├── templates/ <- EJS templates (layouts, partials for HTMX)
└── package.json <- Defines Postgres and Redis
Phase 3: The AI Configuration Protocol
The agent requires strict boundaries to prevent it from making assumptions about your tech stack or development workflow. Populate
SKILLS.md# Project Name: Antigravity Agent Skills & Engineering Standards
## 1. Architectural Philosophy & Core Directives
* **Architecture Pattern:** [Define your architecture here, e.g., Modular Monolith, Microservices, MVC].
* **Domain Isolation:** Code must be strictly separated into logical domains.
* **Performance Mandate:** [Define your performance baseline, e.g., HTTP responses <100ms, offload heavy tasks to background queues].
## 2. Technology Stack & Rules
* **Runtime & Language:** [e.g., Node.js 20+, TypeScript 5+].
* **Strict Typing:** NEVER use the `any` type under any circumstances.
* **Frameworks:** [Define your backend and frontend frameworks, e.g., Express.js, Tailwind CSS].
* **Absolute Restrictions:** [Define what the agent must NOT use, e.g., Do NOT use React or complex frontend build pipelines].
## 3. Data Persistence & Security
* **Database Engine:** [e.g., PostgreSQL 16+].
* **Validation:** Absolutely every piece of incoming data must be validated against strict schemas before interacting with the database.
* **Security Boundary:** All backend logic, routing, and configuration must remain private and inaccessible from the webroot.
## 4. Workflow, Documentation & Collaboration Protocols
As a complete coding partner, you must strictly adhere to the following operational lifecycle:
* **Pre-Flight Context Check:** Before commencing work on any new feature, you MUST locate and review the relevant specification documents. Never guess the requirements.
* **Propose Before Execution:** Do not write large blocks of code immediately. Propose a step-by-step implementation plan, discuss it, and await confirmation before executing the code.
* **Documentation Synchronisation:** The documentation is the single source of truth. If a discussion results in a new schema, route, or strategy change, you must update the relevant `.md` specification files immediately.
* **Progress Tracking:** Maintain two living documents in the root directory: `CHANGELOG.md` (to record completed work) and `TODO.md` (to track current tasks, known bugs, and future ideas). You must automatically update these files at the conclusion of every major task.Phase 4: The Onboarding Prompt
Once the software is installed, the folders are secured, the
SKILLS.mdWe are starting a new project. Before we begin any development, you MUST read and ingest the .antigravity/skills.md file. This file contains our strict architectural boundaries, technology stack, security rules, and our operational workflow. Please confirm you have read it, and provide a brief summary of how you will approach our first task using the workflow protocols.Your Antigravity agent should respond confirming injestion of the
SKILLS.mdLast modified: April 28th, 2026

")
")
")
")
")
")
")
")
")
")


